As the volume of event logs and the complexity of corporate network infrastructure grow day-by-day at an unfathomable rate, mining the esoteric event log data becomes a taxing task for the network administrator. EventTracker recognized the gravity of the issue and came up with a holistic and single view management model called Collection Point model.
Collection Point model facilitates you to collect cab files from geographically or logically dispersed branch offices and generate consolidated audit reports from a centralized location. Collection Point works on a client-server model, whereby the Collection Points (clients) installed at the branch office locations periodically send the cab files to the Collection Master (server) installed at the corporate headquarters.
Since Collection Point model utilizes TCP as a transport layer, Collection Master (server) acknowledges every packet sent by Collection Points (clients). This assures recovery from data that is damaged, lost, duplicated, or delivered out of order by the Internet communication system. Moreover, the encryption mechanism assures the confidentiality and integrity of data is not compromised while it traverses through the public network. Every Collection Point (client) can be configured to report up to five Collection Masters (servers) simultaneously.
Standard Console
Best suited for (single-level) flat topologies where all monitored nodes report directly to one or more EventTracker Managers.
Collection Master Console
It is best suited for hierarchical topologies. Being designated as a Collection Master, receives archives (CAB files) replicated by Collection Points.
Collection Point Console
Best suited for hierarchical topologies where all monitored nodes report directly to a local EventTracker Manager, which is designated as a Collection Point, replicates archives (CAB files) to one or more Collection Masters.
Collection Point model is best suited for organizations having multiple sites. The sites may geographically spread across the globe or do exist in the same precinct but with a robust setup.
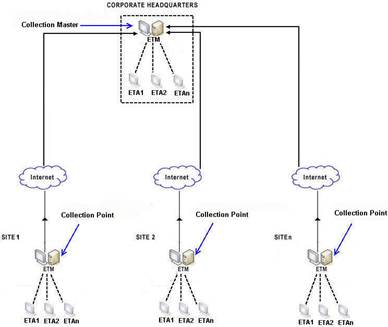
Scenario 1:
In the below-depicted scenario, all the Collection Points (clients) send their respective cab files periodically to the Collection Master (server) at the corporate headquarters.
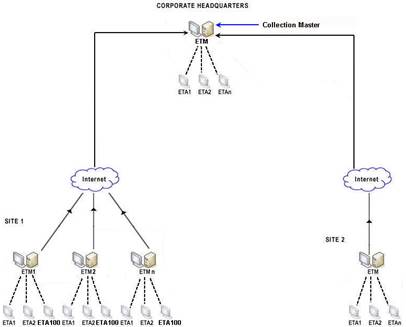
Scenario 2:
In this scenario, SITE 1 does exist physically in the same premises, which runs n number of EventTracker Managers. Each EventTracker Manager running Collection Point (client) will send the respective cab files to the Collection Master (server). The crux of the matter is that the Collection Master treats every individual EventTracker Manager running Collection Point (client) and the constellation of EventTracker Agents as different entities, no matter whether they exist in the same campus or on the same floor.
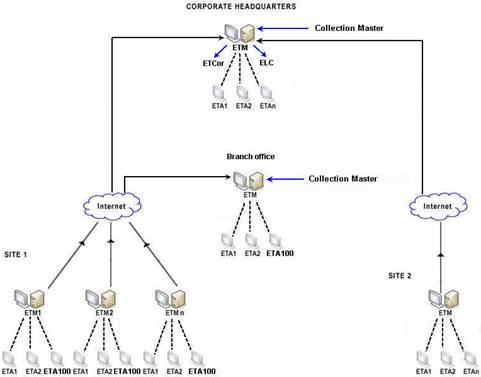
Scenario 3:
The scenario above corroborates the statement that one Collection Point (client) could be configured to report up to five Collection Masters (servers).
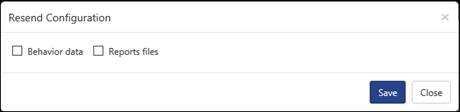
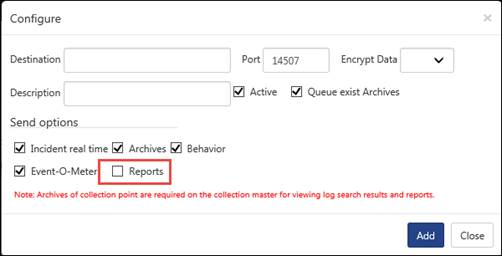
If CP is not sending Reports, behavior, Event-O-Meter or behavior data, the respective CP site will not be shown under the respective features of CM. You can now send Reports, Behavior, Sparse matrix, Event-O-Meter events to Collection Point.
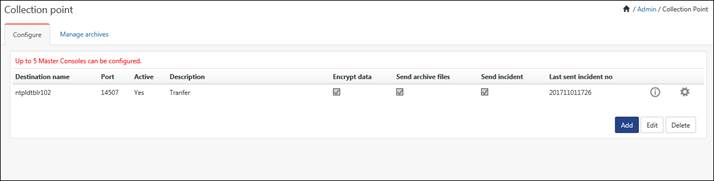
1 To view Collection Point configuration, log on to EventTracker Enterprise.
2 Click Admin, and then click the Collection Point.
EventTracker displays the Collection Point page.
|
Click |
To |
|
Add |
Add new Collection master(s)/ manager(s). |
|
Edit |
Edit Collection master(s)/ manager(s) configuration settings. |
|
Delete |
Delete Collection master(s)/ manager(s) configuration settings. |
|
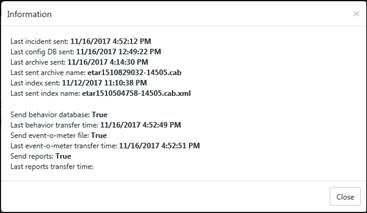
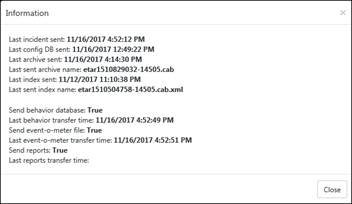
Information |
Click Detailed regarding the Last sent incident, archives, db, index time displays.
|
|
Resend Configuration |
Click
|
Every Collection Point can be configured to send CAB files simultaneously up to 5 Collection Masters. The Collection Master may exist in the same domain or in the trusted domain. Collection Points can be configured to send both cab files and incidents.
You can now send Reports, Behavior, Sparse matrix, Event-O-Meter events to Collection Master.
The user who is sysadmin in SQL should only change the archive path on a CM machine. Since ET admin user will not have rights to CP site data base and changing the archive path will fail.
1 To configure Collection Master, click the Configure tab if not selected.
2 Click the Add button.
|
2 NOTE |
|
To send CP generated reports to CM, click the checkbox Reports option as highlighted in the figure above. By default, the Reports checkbox will be disabled. |
|
Field |
Description |
|
Configure- Configured Collection Master(s) details are displayed on this page. |
|
|
Destination |
Type the name / IP address of the Collection Master. |
|
Port |
Default port is 14507. You can modify the port number. Port numbers should be same on both the Collection Master and Collection Point. |
|
Encrypt Data |
Select an appropriate option to encrypt data. |
|
Active |
By default, EventTracker selects this checkbox to activate the Collection Master. Hence the incidents and archives will be sent accordingly. NOTE: Collection Point will not send CAB files to the Collection Master(s) if that is Inactive. |
|
Description |
Type short description about the Collection Master. |
|
Queue exist CABs |
By default, EventTracker selects the Queue exist CABs checkbox and queues all existing CAB files. Clear this checkbox to queue only new CAB files. |
|
Send incident real time |
To forward real time incidents, enable this option. |
|
Send Archives |
To forward archive files, enable this option. |
|
Send Reports |
To forward reports to Collection Master, enable this option. |
|
Information |
The Collection Point displays detailed information regarding last incident / archive / index sent, date and time.It also includes the CAB and XML file name. You can now send Behavior, Sparse matrix, Event-O-Meter events to Collection Point.
|
|
2 NOTE |
|
You cannot configure more than 5 Collection Masters. |
3 Enter/select appropriate data in the relevant fields and then click the Save button.
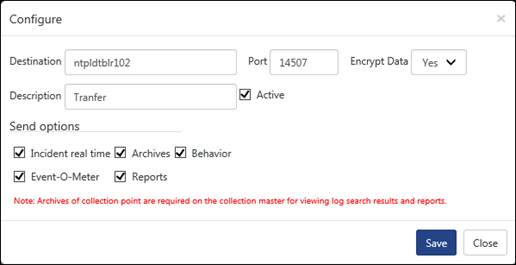
1 To edit Collection Master settings, click Configure tab if not selected.
2 Select the Collection Master, and then click Edit.

3 Enter/select appropriate changes in the relevant fields, and then click Save.
|
2 NOTE |
|
The updated Collection Point name will be shown in all places of EventTracker i.e. reports system tree, EventVault explorer system tree and Incidents Dashboard -> All Sites.
|
1 Click the Configure tab if not selected.
2 Select the Collection Master and then click Delete.
EventTracker displays the confirmation pop-up window.
3 Click Ok.
EventTracker deletes the selected Collection Master Configuration settings
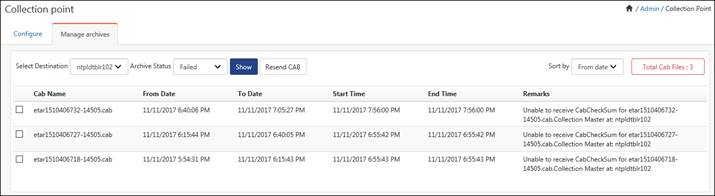
This option helps you view status of the CAB files that are transferred and being transferred by the Collection Point to the Collection Master(s).
1. To manage the archive files, click the Manage archives tab.
|
Field |
Description |
|
Select Destination |
Select Destination from the drop-down list. All configured Collection Masters are listed in this drop-down list. |
|
Archive Status |
Available options are Success, Failed, Not Sent, In Progress and Queued. Select the status of the archive files from this drop-down list and then click Show. |
|
Resend CAB |
If you wish to resend the CAB files again, click Resend CAB button. |
|
Sort By |
Sort the CAB files based on From date / To date / CAB name. |
1 Select the Collection Master from the Select Destination drop-down list.
2 Select the status from the Select CAB Status drop-down list.
3 Select the required CAB files, and then select Resend CAB.
Collection Point resends the CAB file(s) to the destination(s).
This option helps you to view Collection Master Console.
1 To access Collection Master, log on to EventTracker Enterprise.
2 Click the Admin, and then click Collection Master.
EventTracker displays the Collection Point Master page.
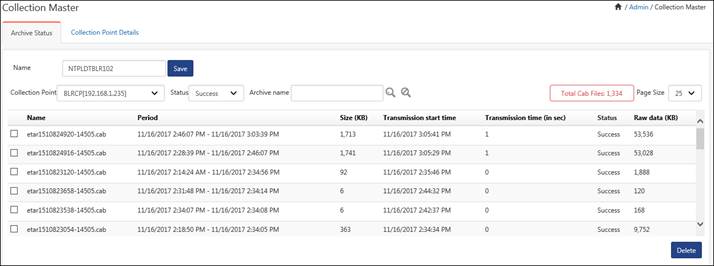
‘Archives Status’ tab is selected by default.
|
Field |
Description |
|
Name |
Name of the CAB file. |
|
Collection Point |
Select the Collection Point from this drop-down list. All clients reporting to the Collection Master are listed in this drop-down list. |
|
Status |
Select the status of the cab files from this drop-down list and then click Show. Available options are Success, Failed and In Progress. |
|
Archive name |
To search for a particular archive, enter name of the archive and then click Search |
This option helps you view details of the Collection Points that are forwarding CAB files to the Collection Master.
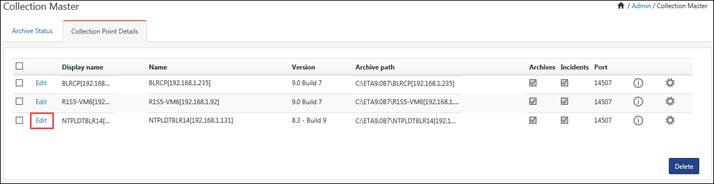
§ To view Collection Point data, click the Collection Point Details tab.
EventTracker displays the Collection Point Details page.

|
Field |
Description |
|
Display name |
Name of the Collection Point. |
|
Port Number |
Default port is 14507. You can modify the port number. Port numbers should be same on both the Collection Master and Collection Point. |
|
Collection Point Name |
Displays the name of the Collection Points that are reporting to the Collection Master. |
|
Version Info |
Displays the version of the Collection Points. |
|
Archive Path |
Displays the path of the folder where cab files of the respective Collection Points are stored at the Collection Master computer. Example: …\Program Files\Prism Microsystems\EventTracker\Archives\NEWYORK[191.155.1.100] |
|
Receiving Archives |
This option is checked if the archives are successfully received. |
|
Receiving Incidents |
This option is checked if the incidents are successfully received. |
|
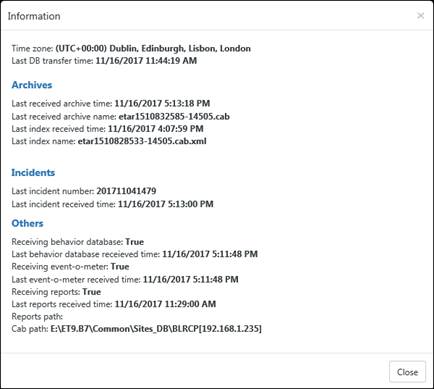
Information |
Displays detailed information regarding Archives and Incidents. Refer the picture below.
|
|
Settings |
Purging of archive files and incidents sent from Collection Point to Collection Master have been implemented.
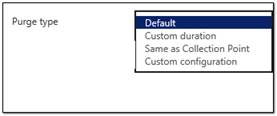
a) Select Archive purging tab, and then select Purge type: drop down.
b) Select Default/Custom Duration/Same as Collection Point/Custom Configuration, and then select the Save button.
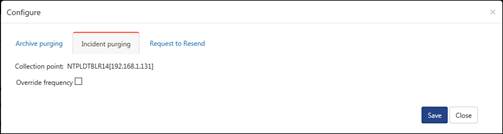
c) Select Incident purging tab, and then select Override frequency.
d) Select Incident purging tab, and then select Override frequency.
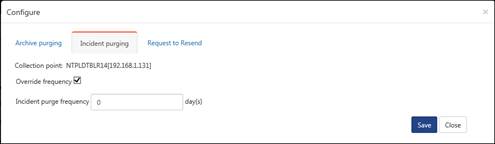
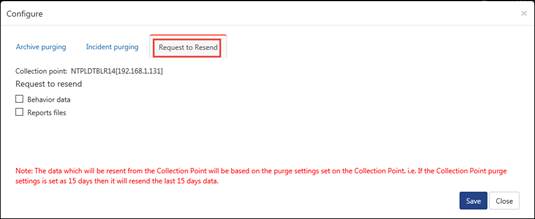
e) Enter Incident purge frequency in number of day(s), and then select the Save button. f) Select Request to Resend tab.
Select the Behavior data/Reports Files to retain the Behavior/Reports that were mistakenly deleted. It will resend the data. |
|
|
g) Enter Incident purge frequency in number of day(s), and then select the Save button. h) Select Request to Resend tab.
Select the Behavior data/Reports Files to retain the Behavior/Reports that were mistakenly deleted. It will resend the data. |
§ To edit Collection Point details, click Edit hyperlink.
§ Enter a unique display name and then click the Update button.
|
2 NOTE |
|
The updated Collection Master name will be shown in all places of EventTracker i.e. reports system tree, EventVault explorer system tree and Incidents Dashboard -> All Sites. |
This option helps you configure listening port of the Collection Master. By default, EventTracker Collection Master and Collection Points communicate through port 14507. If you want to configure a new port other than the default one, you can update it by going to the Admin> Manager > Collection Master Port for successful communication between the Collection Points and Collection Master.
1 To configure Collection Master listening port, click the Archive Status tab.
2 In Collection Master pane, type the Name: and Port No:, and then click the Save button.
1 To delete CAB files, click the Archive Status tab.
2 Select the checkbox against the CAB files, and then select the Delete button.

1 To delete Collection Point data, click the Collection Point Details tab.
2 Select the Collection Point, and then select the Delete button.
|
2 NOTE |
|
When you delete details of a particular Collection Point, EventTracker will also delete their respective CAB files. Deleting a CP will delete both cab files and incidents. To delete all CP’s, you can also select the checkbox on the title bar, and then select the Delete button.
|