Parsing rules are user-defined tokens. Apart from the standard report definition format, EventTracker reports module provides a simple, yet powerful log Flex Reports, reporting facility.
It helps to parse and include parts of clogged syslog like messages and Windows event descriptions as columns in reports.
Parsing rule helps you define new tokens, bind it with the dynamic report templates and generate flex reports. EventTracker displays the parsed data under those tokens defined by you.
While configuring Flex reports, you can also select the report columns you are interested in, apply filters, sort report columns, and rearrange the order of the columns that should appear in reports.
To put it in a nutshell Parsing rules helps to manipulate data and generate comprehensible reports.
Scouring the components of log data is massively time. Data contains pieces of information.
Since valuable information is dumped in the log description, there should be a way to break down and analyze the data, and turn it into valuable business information.
Furthermore, there is no standardized message format as various vendors of NIX systems follow different conventions.
For example, comma-separates values, fixed-width text, and free-form text are used by an administrator to decipher syslog messages.
A common questions that arises would be,
· ‘Is it not sufficient to generate Flex reports with templates provided with EventTracker?’
· Is EventTracker flexible enough to add tokens?
· If so, does not EventTracker provide any predefined tokens to simplify my work?
· Is it possible to define my own tokens?
If you’re preoccupied with these questions, relax!
EventTracker is shipped along with a precisely defined set of tokens for your convenience. Should you wish to add tokens if these predefined tokens do not align with your requirement, EventTracker provides adequate facilities to add/modify/delete tokens. Otherwise, default tokens are sufficient.
It’s left to your discretion. While defining new Token-Value, you have the luxury of saving the Token-Values permanently in the database or binding the Token-Value just for one instance of report generation.
It is appreciable to have comfortable knowledge and understanding of syslog message formats of different flavors of NIX systems. Though the fundamental tenets insist on simplicity, the creators of syslog write the messages according to their whim and caprice. So suit yourself to the environment you work in to understand the syntax and semantics of syslog messages.
Components of Parsing rules are the basic elements that are essential in framing your queries to extract required data from the log messages.
Token is the “key” that reporter engine regards as a reference point and considers the string that succeeds for parsing. It is optional to provide token and can contain:
· Characters (a, b, c…)
· Numbers (1, 2, 3…)
· Special characters (#, $, %), space character…
· or combination of all three (a1#)
If there are multiple occurrences of token in the description, reporter engine considers only the first occurrence as reference point. So, be specific while you frame your query.
Display Name is a temporarily assumed name (alias) for the queried string. This name will appear as ‘token’ in the report. It is mandatory to provide display name and should be unique throughout the report. You can select any name and can contain:
· characters
· numbers
· or combination of these two
· special characters are not accepted
Separator is a character or word which separates key and value in the description. It is optional to provide separator and can contain:
· characters
· numbers
· special characters
· or combination of all three
Terminator is character or word to determine end of key value pair in description. The queried string is extracted till the first occurrence of the terminator. It is optional to provide terminator and can contain:
· Characters
· Numbers
· Special characters
· or combination of all three
Thus, parsing rule offers flexibility to customize:
· Data selection
· Sort sequences
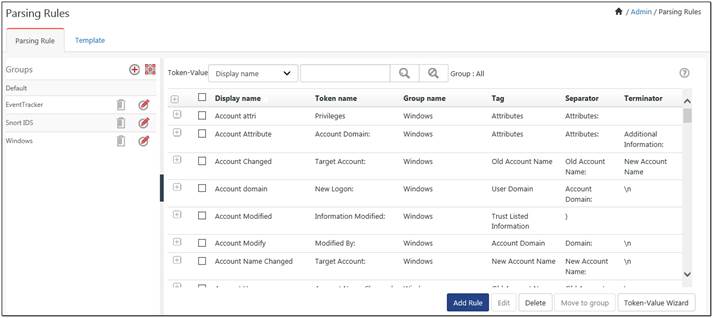
1 To view Parsing Rules, select the Admin drop down, and then select Parsing Rules.
The default Token-Value groups display. EventTracker provides predefined parsing rules.
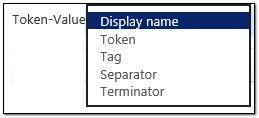
2 To search based on token values, click Token-Value drop down, and select the required option.
3 Enter the search criteria in the Search box and then click the Search ![]() icon.
icon.
Ex: To search for Token Value 'audit policy', enter the word 'audit policy' in the search box, and then click the search icon. The respective information is displayed.

4 To clear the search criteria, select the Clear all ![]() icon.
icon.
The default Token-Value Groups are available in the Token Value pane.
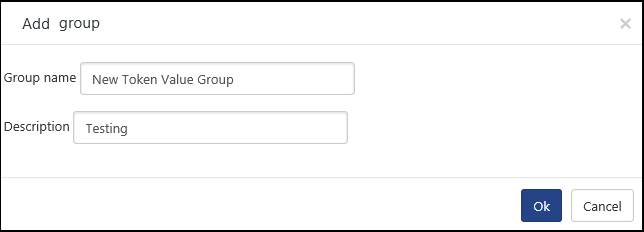
1 To add a new group, click the icon![]() .
.
2 Enter the relevant group name, description and then click OK.
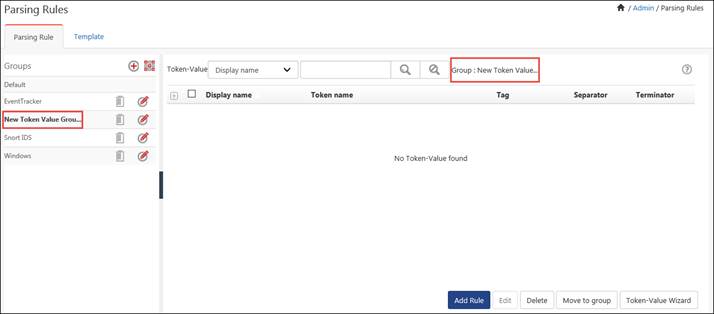
A new token value group is created.
1 To add a new rule, click the Add Rule button.
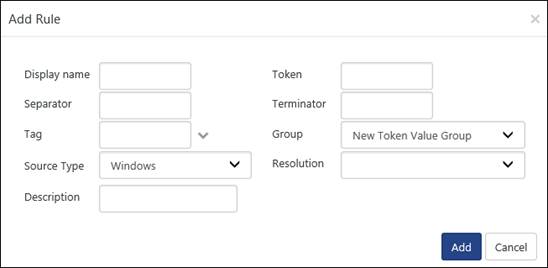
2 Enter relevant data, and then click Add.
· Ex: The following Key value pairs can be added in the following way.
· Display name: Logs Summary
· Token: Log Time
· Separator is ‘:’
· Terminator: \n
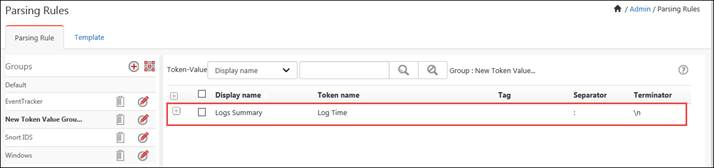
· The new rule displays in Token-Value pane.
|
2 NOTE |
|
There can be more than one Token-Value with the same Display name but one of the tokens, separator or terminator should be different/unique. Ex: The Display name is the same in the screenshot given below but the separator is different.
|
3 To edit the token value, click Edit button, make the required changes and then click Save.
|
2 NOTE |
|
You can edit only one Token-Value at a time. |
4 To delete the token value, click the Delete button.
5 To the token value to another group, click Move to group.
|
2 NOTE |
|
You can move to another group if there are other Token-Value groups existing apart from the Selected one. |
1 To view Token Value Wizard, select the Admin, select Parsing Rules.
The default Token-Value groups display.
2 Select the Token Value Wizard button.
The Token-Value Wizard displays Sample Logs window.
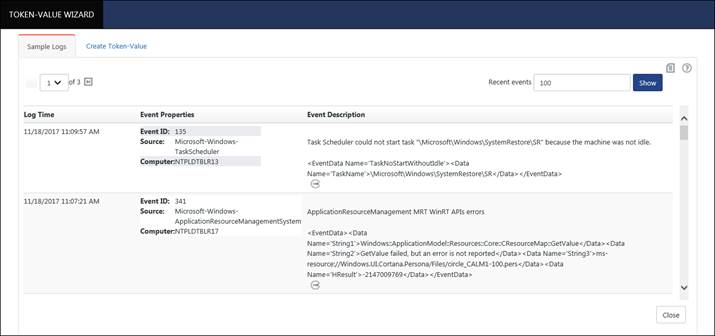
3 Click any one of the Extract Token Value Pairs ![]() icon.
icon.
Create Token-Value tab displays with additional data.
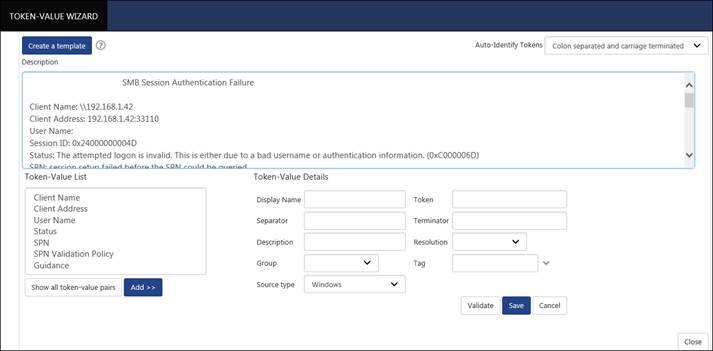
4 Select a Token Value List and then click the Add >> button.
Ex: Select Client Name in Token Value List and then click Add.
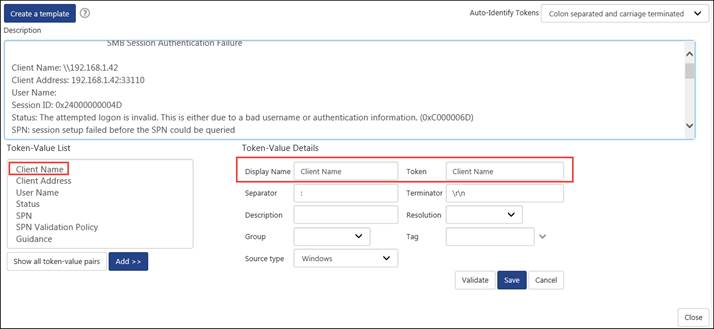
Token-Value Details display.
You can make the changes in the default values displayed.
5 Click Validate, and then click Save.

1 Select the Admin, and then select Parsing Rules.
The default Token-Value groups display. EventTracker provides predefined parsing rules.
2 Select the Template tab.
The Template group displays in the left pane and the Templates display in the right pane.
3 To Search a group name, enter the name in the Search box and click search icon![]() .
.
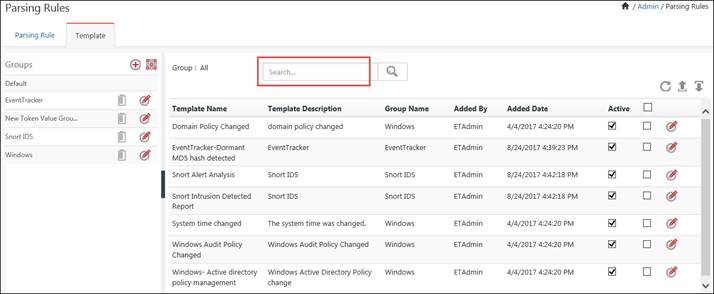
4 To export or import configuration, use export ![]() icon or import
icon or import ![]() icon.
icon.
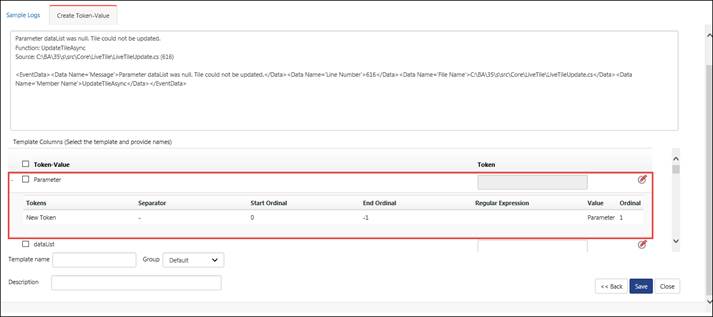
1. In Token-Value Wizard, click Create Token Value tab,
2. Add description and click on Create a Template.
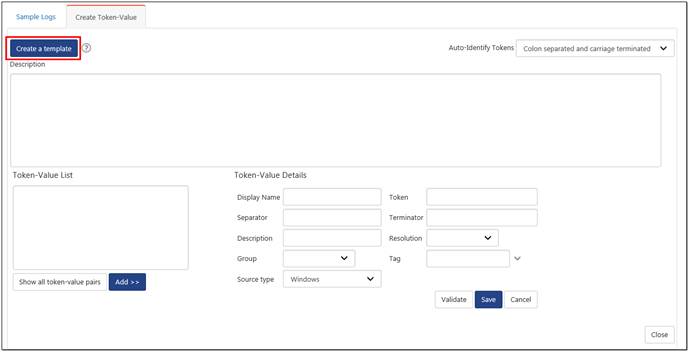
The below page displays:

3. Enter the required changes in Token Value option and Token.
4. Enter a Template name.
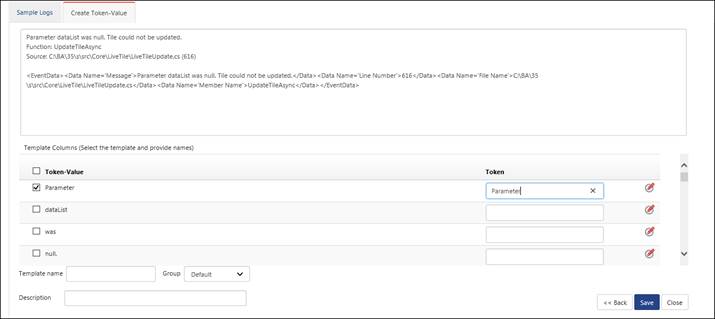
5. To filter the values further click the ![]() icon.
icon.
EventTracker: Defined Template window displays.
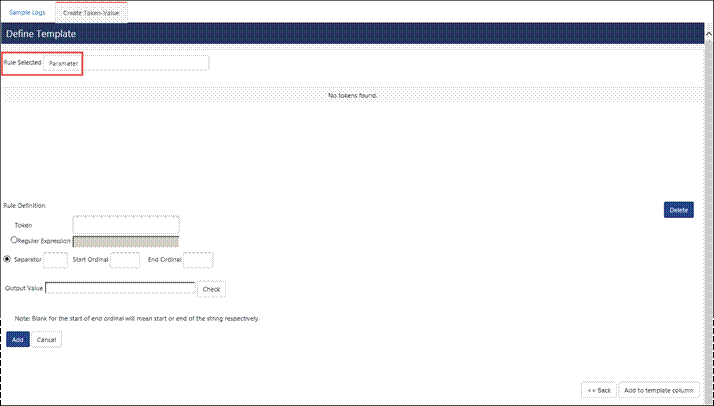
6. Enter the relevant data and then click Add.
Ex: Enter a token name (i.e. New Token), Output value (i.e. Parameter).
You can select Regular Expression or Separator. A regular expression is used to find a particular pattern.
· Select a separator as ‘-‘. It can be space, equal ‘=’ symbol etc.
· Select the ordinal values (i.e. Numeric) to further separate the rules.

7. Click Add to template column.
8. Click the Save button.
Now, In Define Parsing Rule(s) window, the created new template displays in Template tab.
1 Log on to EventTracker Enterprise, click the Reports icon, and then select Dashboard or Configuration.
2 Click the New button in Dashboard/Configuration.
3 Select any one of the Compliance / Security / Operations / Flex reports /Alphabetical tab.
4 Expand the Report Tree node and select any report. Select Report Type as On Demand. Click Next.
For Example: In Flex Reports tab, select Logs, and then select Summary.
Report Type selected is On Demand.
EventTracker displays the Reports Wizard.
5 Click Next >>.
6 Select the required options (like Sites, Group, Systems, Show all sites, All Systems).
7 Select Realtime or File Transfer and then click Next>>.
8 Select the required Interval and Limit to time Range option.
9 Select the required Export Type (i.e. PDF file, Word Document, HTML file, Quick View (not saved on hard disk)).
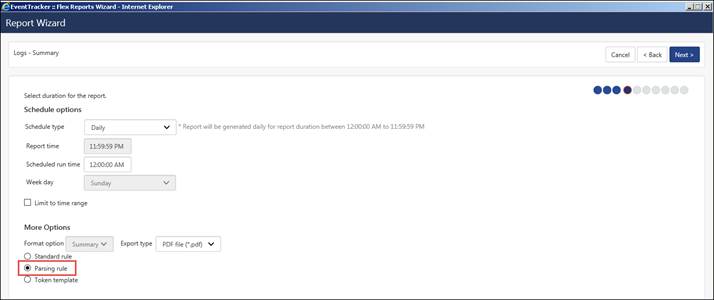
10 Select the required Format option.
---------------------------------------------------------------------------------------------------
Ex:
a. If you select Parsing Rule option. Click Next>>.
Logs Summary displays to select the parsing rule.
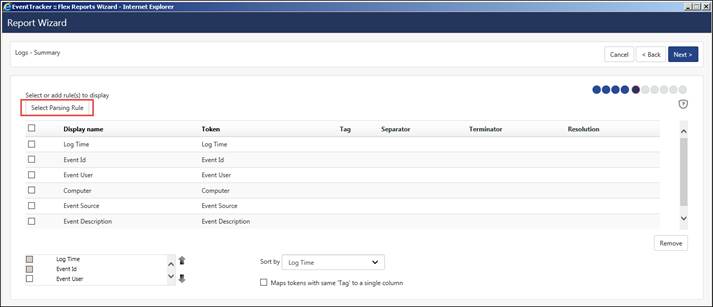
b. Click Select Parsing Rule hyperlink.
Search Parsing Rule window displays.
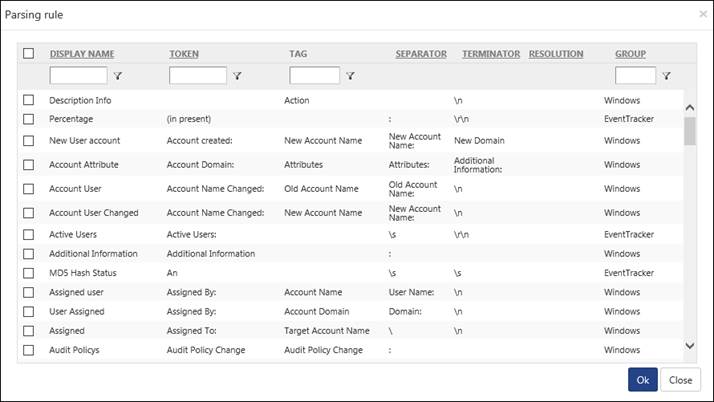
c. Select the required options and then click OK.
Logs Summary (i.e. Step 5) displays.
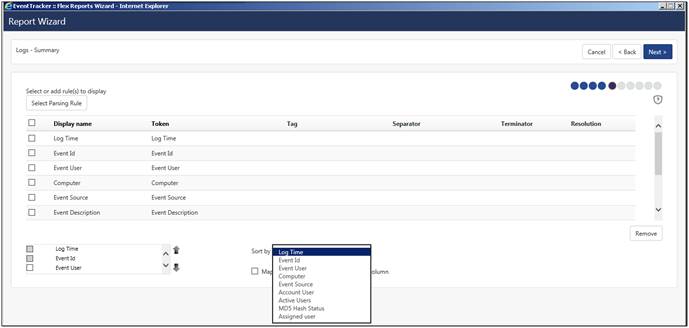
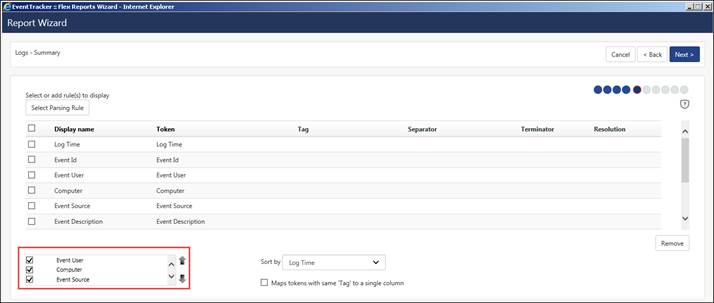
d. Select any Summary option; select an appropriate option in Sort by drop-down.
e. Select Map Tokens with same ‘Tag’ to a single column, if required.
(OR)
f. If you select Token Template, click Next>>.
g. Select a template. (i.e. enter the template name which you had earlier configured in Parsing Rules – Token Value Wizard)
h. Select/Enter the required options and then click Next>>.
-------------------------------------------------------------------------------------
11 Click the Next>> button.
12 Enter the appropriate Refine and Filter details.
13 Click the Next>> button.
14 Enter the relevant Title, Header, Footer, and Description data.
15 Click the Next>> button.
Review cost details and configure the publishing options window displays.
|
2 NOTE |
|
Publishing options are disabled because On Demand (foreground processing) has been selected. |
16 Click the Next>> button.
The last step of Completing Report Configuration Wizard displays.
17 Select Generate Report.