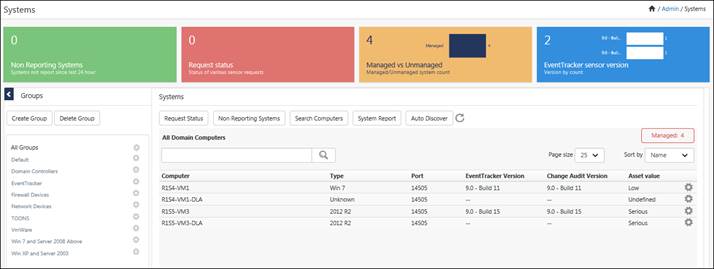
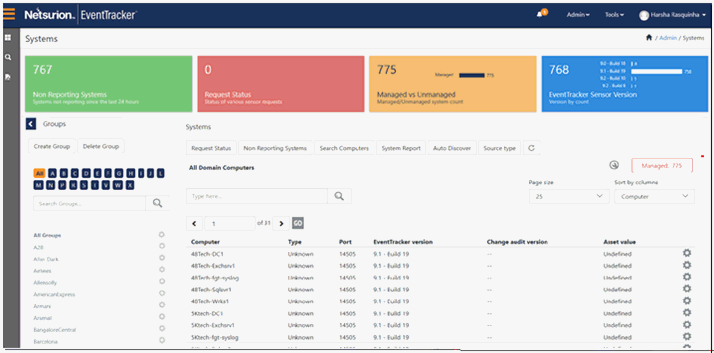
This is a centralized location to discover and mange the systems that are present in an enterprise domain and to deploy the remote agents.
Systems manager helps you to:
§ Automatically discover enterprise domains and systems
§ Manually add systems if you opt to
§ Manage EventTracker Windows agent and Change Audit agent
§ Manage logical system groups
1. Click the Admin, and then select Systems.
EventTracker displays Systems Manager screen.
|
Field |
Description |
|
Computer |
Name of the computer or name of the DLA / NetFlow instance. |
|
Type |
Operating system installed on the computer. |
|
EventTracker Port |
Port through which the EventTracker Windows agent and the EventTracker manager communicates. |
|
EventTracker Version |
Displays EventTracker version and build number. |
|
Change Audit Version |
Displays Change Audit version and build number. |
|
Asset Value |
Asset value indicates how important or critical the computer is. |
|
Click |
To |
|
Create Group |
Create logical system groups. |
|
Delete Group |
Delete logical system groups. |
|
Interface Manager |
Modify Netflow interface details. |
|
Request Status |
Checks install / upgrade / uninstall status of EventTracker Windows agent / Change Audit agent. Also, to check status of computer search. |
|
Non Reporting Systems |
Search a list of systems which have not reported any events to the EventTracker manager in a specific duration of time. |
|
Search Computers |
Manually add enterprise domains and computers. |
|
System Report |
Generate status report of managed and unmanaged computers. |
|
Auto Discover |
Automatically discover enterprise domains and computers. |
System Manager adds domains and computers in two modes, namely Auto and Manual. In auto-discover modes ‘System’ manager creates system groups based on enterprise domains.
The Auto Discovery mode detects and adds all systems found on all trusted domains. The auto discovery process includes an initial quick detection for systems and a background search for more systems.
1 To automatically discover systems, click the Admin, and then click Systems.
2 Click Auto Discover at the upper-right corner.
System manager displays confirmation message.
3 Click the Ok button.
System manager automatically starts adding domains and computers.
OR
Click Cancel to cancel auto-discovery.
|
2 NOTE |
|
Only the user who initiated auto-discovery can cancel it. Auto Discover mode is easy to use and is recommended for networks having less than 100 systems.
|
Unlike in ‘Auto discover’ mode, system manager will not discover any domains or computers in this mode. You have to add them manually.
In ‘Auto discover’ mode, the ‘System’ manager automatically discovers domains and computers when you keep adding them in your enterprise. All you need to do is to refresh the System manager. However, in ‘Manual’ mode, you have to add them explicitly.
This option enables you to add a computer.
1 Click the Admin dropdown, and then click Systems.
EventTracker displays Systems manager page.
2 Click Search Computers button.
System Manager displays the Add Computer(s) pop-up window.
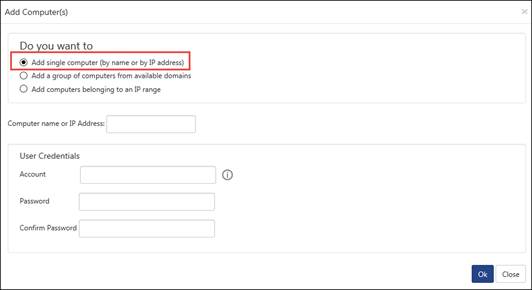
3 Select the Add a single computer (by name or by IP address) option, if not selected.
4 Type the name of the computer in the Enter computer name or IP Address field.
5 Provide valid User Credentials, and then click Ok.
System manager displays the message box.
6 Click OK, and then click the ![]() icon to refresh the Systems manager.
icon to refresh the Systems manager.
7 Click the Request Status button to view the status.

This option enables you to add a group of Computers.
|
2 NOTE |
|
It is possible to add Computers only with available Domains. |
1 To add a group of computers, select the Add a group of Computers from available Domains option.
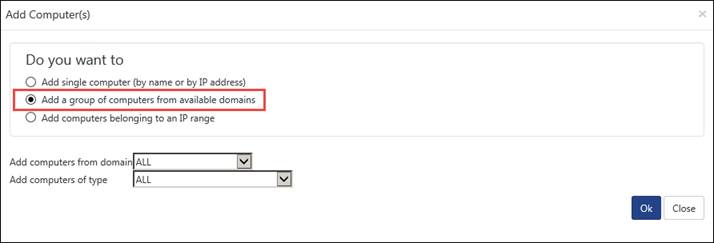
|
Field |
Description |
|
Add computers from domain |
This drop-down list lists the available domains. Select a domain from where you want to add computers. |
|
Add computers of type |
Select a system type from the drop-down list. |
2 Select appropriate options, and then click OK.
A Message from webpage window displays.
3 Click the ![]() icon to refresh the Systems manager in order to view Request Status.
icon to refresh the Systems manager in order to view Request Status.
This option enables you to create a new logical Group of systems based on IP subnet, especially to add legacy Workgroup computers.
1 To add computers from an IP subnet, select the Add computers belonging to an IP range option.

|
Field |
Description |
|
IP range |
Type the IP address range to be added. |
|
DNS discovery alone |
The specified IP range will be discovered using DNS method. |
|
SNMP discovery alone |
The specified IP range will be discovered using SNMP method. |
|
Ping discover alone |
The specified IP range will be discovered using Ping method. |
|
All |
The specified IP range will be discovered using DNS /SNMP/Ping method. |
|
SNMP community string |
A password which is necessary to read/write SNMP data. |
2 Enter appropriate data in the relevant fields, and then click OK.
3 Click the ![]() icon to refresh the Systems manager.
icon to refresh the Systems manager.
The computers are added to the selected domain.
Logical system groups help you group computers that you wish to monitor exclusively. You can select computers by O/S type, from IP subnet or pick them manually.
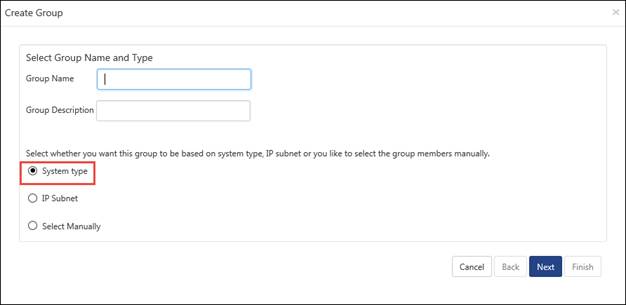
This option enables you to create a new logical Group of systems based on system type.
1 To create a new logical group and systems based on System Type, click Admin drop down, select Systems.
2 Click the Create Group button.
System manager displays the Create Group dialog box window.
|
Field |
Description |
|
Group Name |
Type the group name in this field. The group name should be unique. |
|
Group Description |
Type the group description in this field. |
|
Group Type |
Select the group type option. The options are System Type, IP Subnet and Select Manually. System Type – Enables you to add the selected system type to the group. IP Subnet – Enables you to add the IP subnet to the group. Select Manually – Enables you to add the systems manually from the available list to the group. |
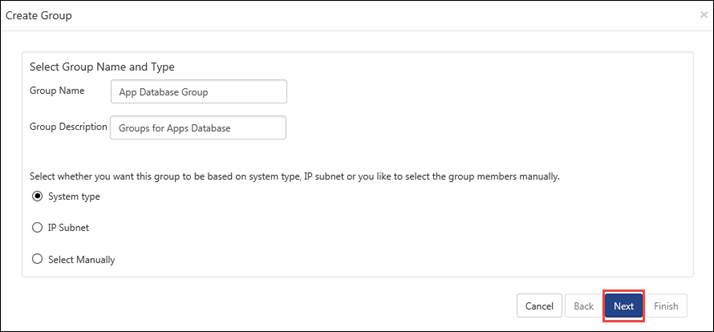
3 Enter appropriate data in relevant fields, and then click Next.
If you select the System Type option, System Manager displays the Create Group dialog box with the option to select O/S type.
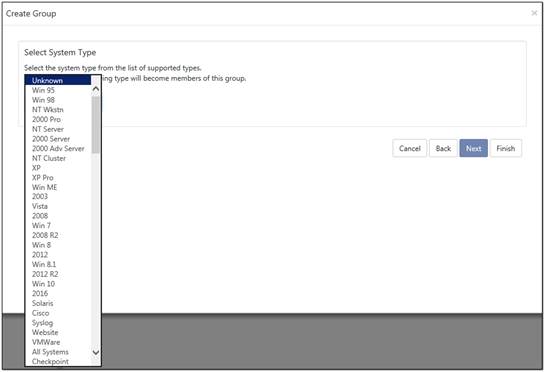
4 Select the system type from the Select System Type drop-down list and then click Finish.
System Manager creates and populates the newly created system group with the systems that have O/S type selected.
This option enables you to create a new logical Group of systems based on IP subnet
1 To create a new logical group and add systems based on IP subnet, select the IP Subnet option in the Create Group pop-up window.

2 Click Next.
System Manager displays the Enter Subnet pane.
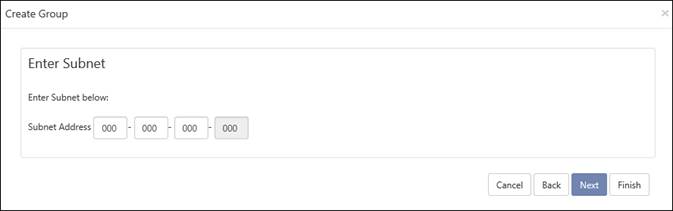
3 Type the Subnet Address, and then click Finish.
System Manager creates and populates the newly created system group with the systems from the IP subnet selected.
This option enables you to create a new logical Group of systems and manually add Computers to that Group.
1. To create a new logical group and add systems manually to that group, select the Select Manually option in the Create Group window.
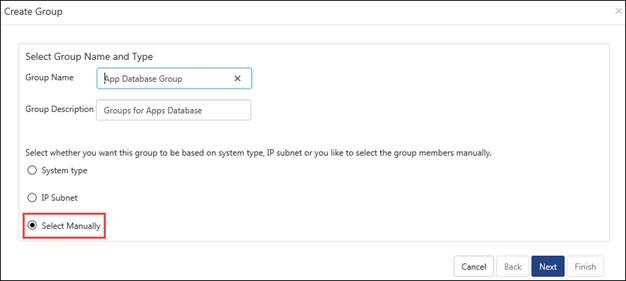
2. Click Next.
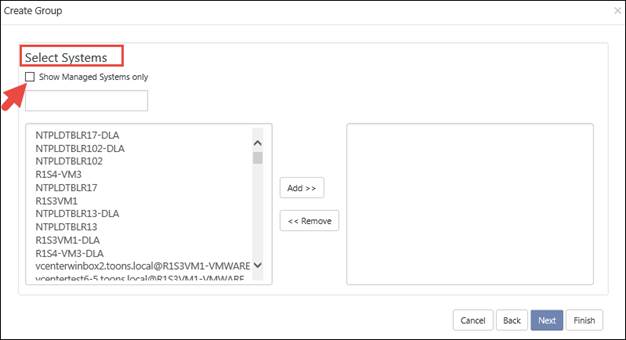
System Manager displays the Create Group pop-up window with the option to select managed and unmanaged systems.
|
Field |
Description |
|
Description |
Type the system-related information in this field. |
|
Group Members |
Select the computer that you want to remove from the group. Click << R emove. |
|
Available Systems |
Select the computer that you want to add to the group. Click Add >>. The selected computer is added to the list of Group Members. |
|
Port |
Select the port number from the dropdown list. |
3. Select the Show managed systems only checkbox to view only managed systems in the list.
4. Select the systems you want to add to the group from the list and select the Add>> button.
5. Click Finish.
System Manager creates and populates the newly created system group with the systems selected.
Through the System Manager groups the auto discovered computers under their respective groups, you can move systems back and forth between groups as you deem fit.
1 To modify a group, open the System Manager. Right-click the group that you want to edit.
System Manager displays the shortcut menu.
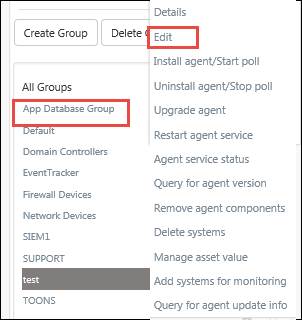
2 From the shortcut menu, choose Edit.
System Manager displays the details of the group with the available systems list.
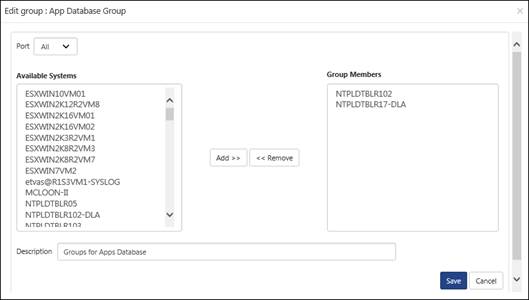
3 Select the available systems, select Add>> or <<Remove, and then click Save.
This option enables you to delete an existing Group.
1. Click the Delete Group button.
System Manager displays the confirmation message box.
1 Click OK.
System Manager displays the list of system groups.

2 Select a group and then click Delete.
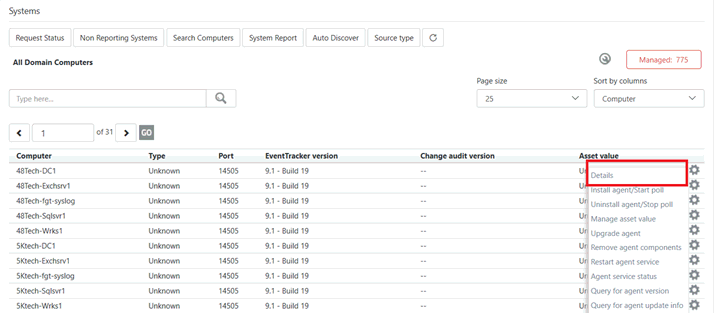
This option helps you view system group details and system details like IP address, O/S Type, port, and Agents running on the system.
1. Click Admin menu, select Systems.
2. To view system group details, in Groups pane, right-click a system group.
System Manager displays the shortcut menu.
From the shortcut menu, choose Details.
System Manager displays the system group Details window.
3. To view managed system details, in Systems pane, move the mouse pointer over a managed system, and then click the dropdown.
System Manager displays the shortcut menu.
From the shortcut menu, choose Details.
System Manager displays the system Details window.

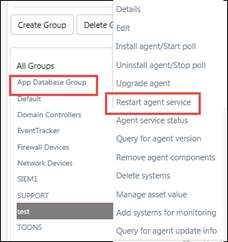
This option helps to restart EventTracker Windows Agent service in managed systems.
1 Click Admin drop-down menu, select Systems.
2 To restart Agent services in a group, right-click a system group.
System Manager displays the shortcut menu.
3 From the shortcut menu, choose Restart agent service.
(OR)
To restart Agent services in a managed system, click the ![]() icon corresponding to the managed system.
icon corresponding to the managed system.
System Manager displays the shortcut menu.
4 From the shortcut menu, choose Restart agent service.
System Manager displays the Restart agent service window.
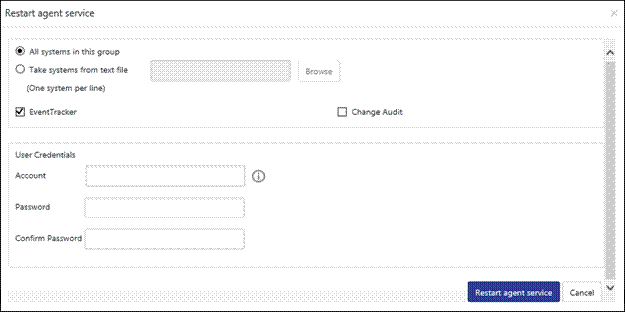
5 Enter valid user credentials and then click Restart agent service.
System Manager displays the status of the action.
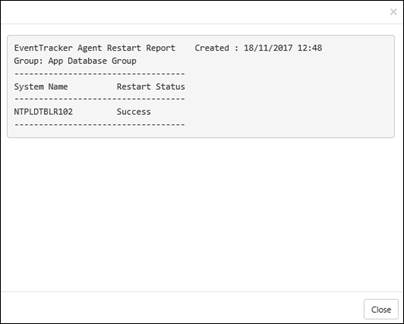
6 To view the status, click the Request Status button.
System Manager displays the Request Status window.

7 Click the View link in the Description column.
System Manager displays the status of the remote agent.
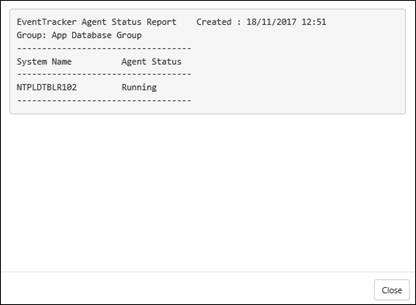
This option helps you query EventTracker Windows Agent service status.
1 To query agent service status, click Admin drop-down menu, select Systems.
2 To restart Agent services in a group, right-click a system group. From the shortcut menu, choose Agent service status.
3 To query Agent service status in a managed system, move the mouse pointer over a managed system, and then click the dropdown. From the shortcut menu, choose Agent service status.
System Manager displays the Agent service status window.
4 Enter valid user credentials and then click Agent service status.
System Manager displays the status of the action.
5 To view the status, click the Request Status button.
System Manager displays the System Status window.
6 Click the View link in the Description column.
System Manager displays the status of the remote agent.
This option helps you query EventTracker Windows Agent version.
1 To query agent version, click Admin drop-down menu, select Systems.
2 To query Agent version in a group, right-click a system group. From the shortcut menu, choose Query for agent version.
3 To query Agent version in a managed system, move the mouse pointer over a managed system.
From the shortcut menu, choose Query for agent version.
System Manager displays the Query for Agent version window.
4 Type valid user credentials and then click Query for Agent version.
System Manager displays the status of the action.
5 As advised on the pop-up window, click the Request Status button.
System Manager displays the System Status window.
6 Click the View link in the Description column.
System Manager displays the version of the remote agent.

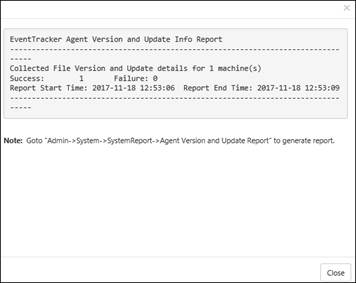
This option helps you query EventTracker Windows Agent update info.
1 To query agent update info, click Admin drop-down menu, select Systems.
2 To query Agent Update Info in a group, right-click a system group. From the shortcut menu, choose Query for agent Update Info.
3 To query Agent Update Info in a managed system, move the mouse pointer over a managed system.
From the shortcut menu, choose Query for agent update info.
System Manager displays the Query for Agent Update Info window.
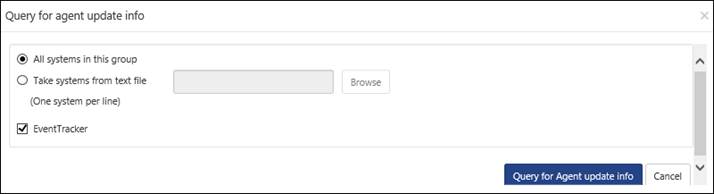
4 Click on Query for Agent Update Info button.
5 As advised on the pop-up window, click the Request Status button.
System Manager displays the System Status window.
6 Click the View link in the Description column.
Check the reportin Admin->System->System Report->Agent Version and Update Report" to generate report.
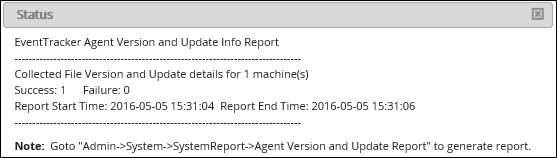
NOTE: Incase an older version agent is reporting, the Request Status will display as “success”.

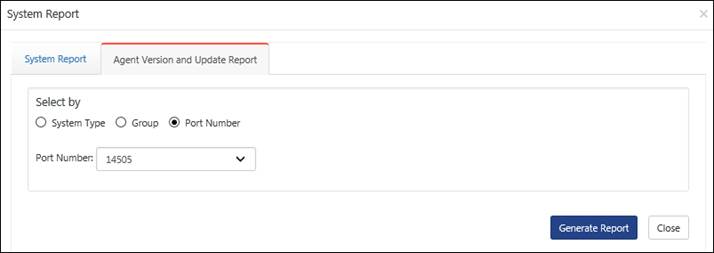
To generate the report, go to Admin->System->System Report->Agent Version and Update Report.
· In System type, select the appropriate system to generate report.
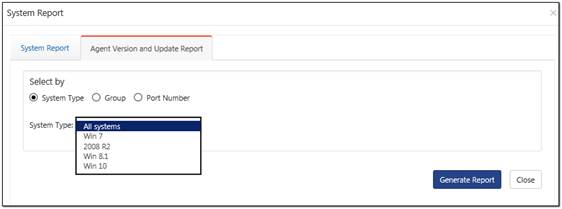
· In group, select the appropriate group along with the systems.
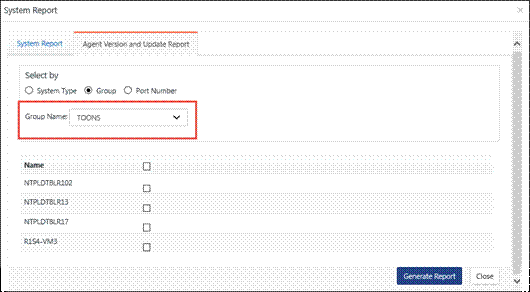
· Reports can also be generated by selecting Port numbers.
NOTE: Only Windows ports are supported.
This option helps you set the asset value of managed systems. Asset Value is the importance or criticality of the computer.
1 Move the mouse pointer over the system that you want to set asset value.
System Manager displays the shortcut menu.
2 From the shortcut menu, choose Manage Asset value.
System Manager displays the Manage Asset Value pop-up window.
3 Select the value from the Asset value drop-down list, and then click Save.
1 To set asset value for multiple systems in a group, right-click a system group.
System Manager displays the shortcut menu.
2 From the shortcut menu, choose Manage Asset Value.
System Manager displays the Manage Asset Value pop-up window.
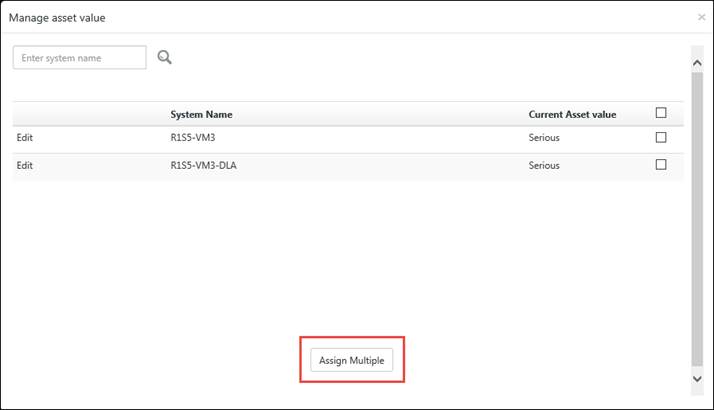
3 Select Edit to change the current asset value of the particular system.
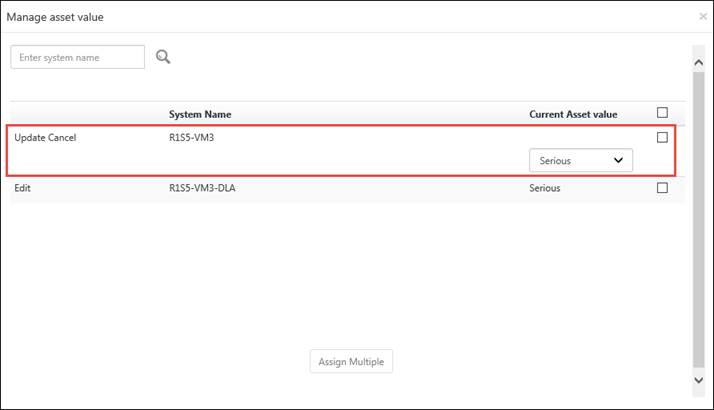
4 Select the asset value from the dropdown, and then click Update.
5 To assign same asset value for multiple systems, select the checkbox for the particular systems, and then click Assign multiple button.
EventTracker displays Assign Asset Value pop-up window.

6 Select the value from the Asset value drop-down list, and then click the Assign button.
This option helps to remove unmanaged systems.
1 Right-click the system group from where you want to remove the systems.
System Manager displays the shortcut menu.
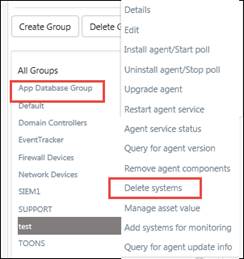
2 From the shortcut menu, click Delete systems.
System Manager displays the Delete systems window.

3 Select the required option and then click Next>>.
4 Select the system, and then click Delete.

Click the Check/Uncheck all checkbox to select all the systems, and then click Delete button.
System Manager displays the confirmation message box.
5 Click OK to confirm
System Manager removes the system.
From the list of all domain computers, this option helps to search system(s) by name.
1 Type the name of the system in the Search in list field. Click the Go button.
EventTracker displays the search result.
2 Click Show All button to view all systems.
This option helps to set the sort option. Sorting can be done in four ways i.e. Name, Asset Value, Port and then Status.
1 Select an option from the Sort by drop-down list.
· If you select Name, EventTracker displays the system names in alphabetical order.
· If you select Asset value, EventTracker displays the system names by priority starting from High.
· If you select Port, EventTracker displays the system names with the port number (in descending order) on the top of the list.
· If you select Status, EventTracker displays the system names by priority starting from Low.
This option allows you to generate report of the Collection Point systems which are reporting to the Collection Master. User needs to select the CP site from the site drop down to generate the system report.
1. In Systems Manager, click the Systems Report button to generate a report of the systems.
System Report page displays.
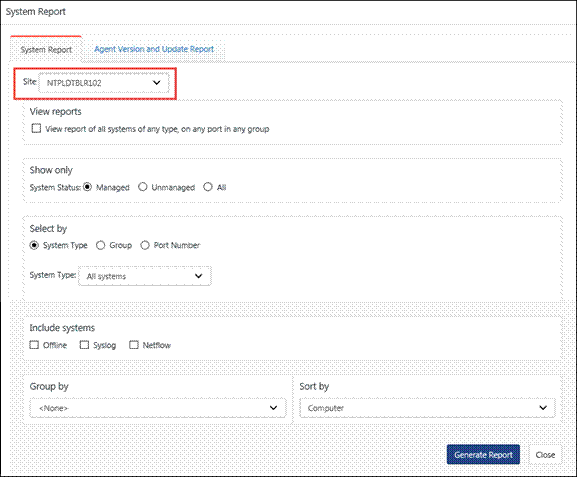
2. Select the required options, and then select the Generate Report button.
In cases where it is not possible or desirable to install the EventTracker Windows Agent, EventTracker can be configured to subscribe/poll the event log of remote computers over the network to collect new event log entries.
Pros
No agent to deploy – Simpler product deployment. There is lesser effort during planning, deployment and upgrade.
Cons
· Increased network load – Depending on the selected polling cycle or level of event generation, network load is greater.
· Greater dependency, more critical points of failure – The Console becomes critical since it is polling target machines. Network choke points can impact performance.
· Limited to operation within a domain – The Console and target machine must be in the same domain so that domain privileges are preserved.
· Performance monitoring – this feature is not available.
· Application monitoring – this feature is not available.
· Software install/removal monitoring – this feature is not available.
· Service monitoring – this feature is not available.
· Monitoring external log files – this feature is not available.
· Host based intrusion detection – this feature is not available.
· Non-domain topologies not supported – this feature is only available when the Console and target machine are in the same Windows domain.
This option enables you to add systems from where you want to collect events periodically. The resource (CPU/memory/disk) usage, log file monitoring, and other agent required features are disabled, in the agent-less monitoring systems. Additionally, the service account of the local agent should have administrative privileges on all the systems that are added for collecting events.
NOTE: Make sure that the Remote Event Log Management is added in the filter exception list in Windows Firewall, or else it will not connect to the target system.
In the System manager page, move the mouse pointer over the system where you wish to install the agent.
a) Click the dropdown icon![]() .
.
EventTracker displays the drop-down list.
b) Click Install agent/ Start poll.
EventTracker displays the Install Agent/Start poll dialog box.
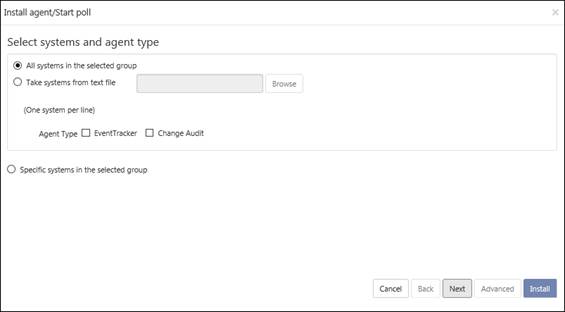
· Check the EventTracker option to install EventTracker agent (Agent-less).
· Check the Change Audit option to install Change Audit agent (Only for agent based option)
c) Click Next.
d) Select EventTracker Agent Type i.e. Agent-less (limited feature)* option.
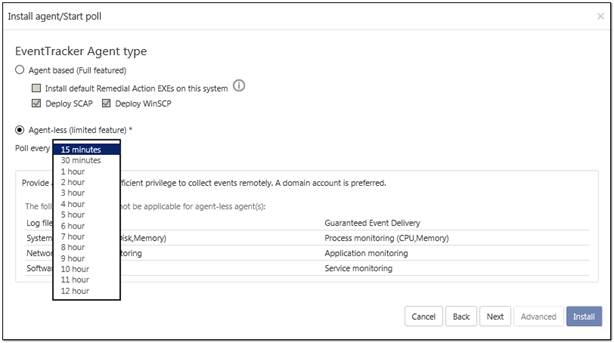
Agent less (limited feature) |
|
|
Select this option to add the system with limited EventTracker Agent features.
|
In the Agent-less type, the following features are not available: · Log file Monitoring · System Monitoring · Network Connection Monitoring · Software Install / Uninstall · Guaranteed Event Delivery · Process Monitoring · Application Monitoring · Service Monitoring
|
|
Poll Every |
By default, the frequency is set to 15 min to receive events from the remote agent system.
NOTE: The poll frequency is applicable for windows 2003 and below and not for Vistas and above.
|
e) Click Next.
EventTracker displays the Install agent/Start poll dialog box with default client installation path on the remote computer.

|
Field |
Description |
|
Polling frequency |
Poll Every Select the time frequency for which you want to get the events. |
|
Domain Admin account |
Type valid user name and password in Account, Password and Confirm Password fields respectively. |
|
Selected Systems |
This field displays the selected system list. |
f) Click Install.
The agent will be installed on the selected machine with the default ‘etaconfig.ini’ configuration.
(OR)
1. To set a more specific configuration, click Advanced.
The Default option is selected by default to apply manager side ‘Agent configuration’ settings (etaconfig.ini).
2. Select Default or Custom config option to select a custom configuration file as per the requirement.
The custom configuration will provide you the templates which you have created in Agent configuration and two more predefined templates.
You can select the template of your choice.
etaconfig_Servers.ini: This predefined template contains the ideal server configurations which can be applied to the selected agent system.
etaconfig_Workstations.ini: This predefined template contains the ideal workstation configurations which can be applied to the selected agent system. This option disables the ‘Offline event sending’ option.
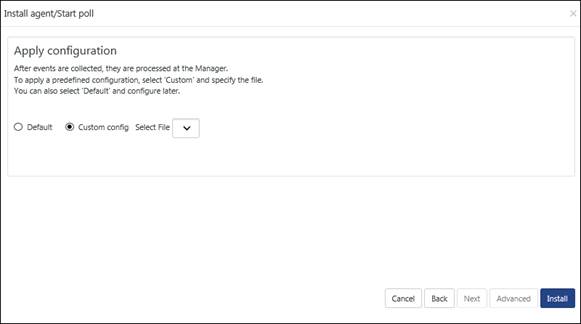
g) Select the configuration file from the File dropdown, and then click the Install button.
EventTracker displays the pop-up window with appropriate message.
h) Click OK.
EventTracker displays Request Status screen.

|
Select |
To |
|
Application |
Sort the Request Status results by the application installed. Available options are EventTracker & Change Audit. |
|
Status |
Sort the Request Status results by status of the application installed. Available options are All, New, Success, and Failed. |
|
Sort by |
Sort the Request Status results by Date application was installed /on which System it is installed / Type of activity performed/ Status of the application. |
|
Purge all status older than |
Remove the older Request Status details from the list. |
|
Export |
Export the ‘System Status’ into Excel format |
i) Click Refresh![]() to view the current status.
to view the current status.
(OR)
Reopen the Request Status dialog box to see the updated status.
j) Click Close.
k) Refresh the System manager.
Now,
1. Open EventTracker Control Panel.
2. Double-Click on EventTracker Agent Configuration.
Only limited feature tabs will be available as shown in the figure below:

Go to EventTracker Web,
1. Click the Admin drop-down list at the upper-right corner.
2. Click the Windows Agent Config.
3. Click the Search system button to select the system.
NOTE: For Agent-less (limited feature)* option, all the above mentioned feature tabs will be displayed but only limited feature will be available.
Systems can be mapped to particular “Source Type” which will improve the Elasticsearch indexer performance.
Elasticsearch indexer performance will improve only when the optimized KO’s are used, and the respective system is mapped to the Source Type
To know the list of optimized KO’s, refer EventTracker Upgrade Guide.
1. Log into EventTracker, click Admin and then choose Systems.
2. The Systems page opens.
In the below available list of the systems choose any system and then click on the Gear  icon, choose Details.
The Details window opens, select the required source type from the list for the system and then click OK.

Similarly, to unassign from the System.
Uncheck the required source type from the list for the system and then click OK.
1. Click on the Source type tab.

2. The System source type window opens.
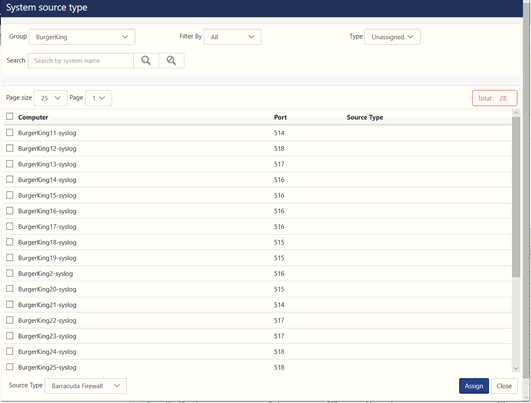
3. You can filter the groups based on Type and Filter By.
You can also search the systems by typing in the search bar.
To assign the source type to the group.
4. Choose the group you want to assign the source type to and Select unassigned option in the Type dropdown.
5. All the unassigned systems appear.
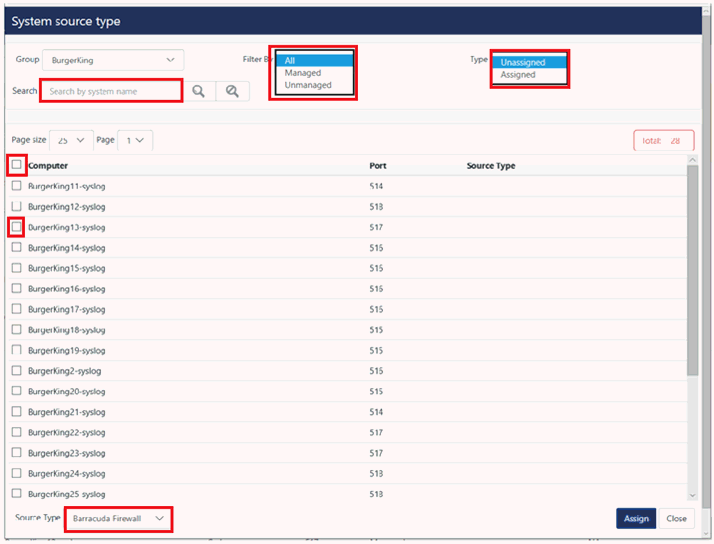
6. Choose the required source type by clicking on the Source Type dropdown at the bottom.
Select the check box next to the computer to select all the computers in that group and click Assign.
You may also uncheck the check box next to the systems to unassign the system.
7. The source type is assigned to all the selected systems of the group.
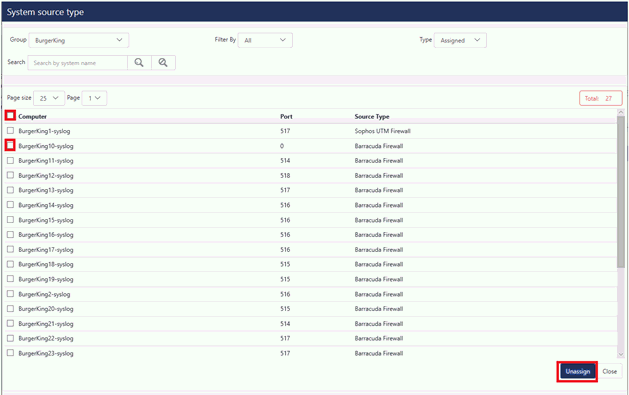
Similarly, to unassign the Group.
1. Choose the Group you want to unassign the source type to.
2. Select Assigned option in the Type drop down.
3. All the assigned systems appear.
4. Click Unassign to unassign source type to all the selected system of the group.
Select the check box next to the computer to select all the computers in that group and click Unassign.
You may also uncheck the check box next to the systems to unassign the system.
5. The source type is unassigned to all the selected systems of the group.