1. To access EventVault Warehouse Manager, select the Start button, select All Programs, and then select Prism Microsystems.
2. Select EventTracker, select EventTracker Control Panel and then select EventVault.
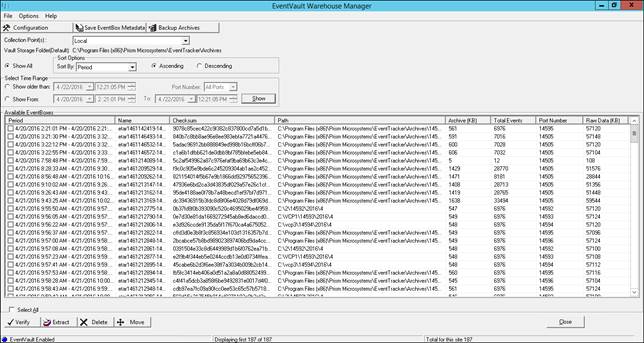
EventVault Warehouse Manager window displays.
|
Field |
Description |
|
|
Available EventBoxes |
||
|
Period |
Time range of events stored in the CAB file. |
|
|
Name |
Name of the CAB file. etar1269949644-14505.cab etar – EventTracker Archive 1269949644 – Time ticks 14505 – Port number (through which EventTracker Receiver service received events) cab – File extension of cabinet files |
|
|
Checksum |
SHA 1 checksum number for tamper proof. |
|
|
Path |
Path of the folder where the archives are stored typically, EventTracker install path\ port number \ year \ month |
|
|
Size (KB) |
Size of the CAB file in KB. |
|
|
Total Events |
Total number of events accommodated in the CAB file. |
|
|
Port Number |
Port number through which the EventTracker Receiver service received the events. |
|
3. Select Collection Point(s): drop-down; select the Collection Point cab file available.
The details of CAB file displays.
1. Click the Configuration button.
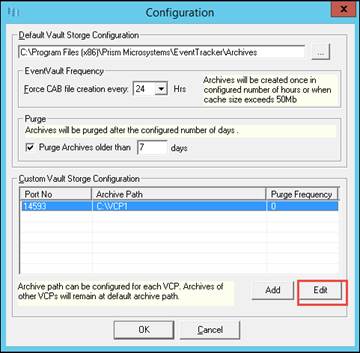
Configuration window displays.
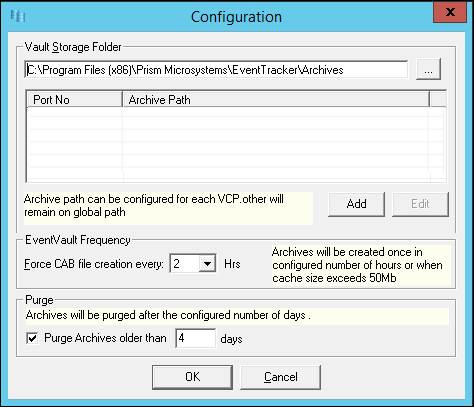
Vault Storage Folder displays the location of the folder where archives are stored.
2. To change the location of the folder where archives are stored, select the Browse button ![]() and then select the new location.
and then select the new location.
(OR)
Manually type the new UNC path in the Vault Storage Folder textbox.
3. To create CAB files, specify the time duration in Force CAB file creation every: drop-down
Archives will be created for the number of hours specified or when cache size exceeds 50 Mb.
4. To purge archive folders, select Purge Archives older than option and specify number of days.
The user can purge the collection point cab file from the collection master.
The EventVault configuration window will now have a list view, which will display the configured ports and their respective configured archive path.
The Ports configured by the user in Manager>Syslog/Virtual Collection Point, will now be listed here and the user can configure archive path for specific VCPs.
1. Click the Configuration button in the EventVault Warehouse Manager window.
2. To configure archive path for a specific VCP, click the Add button.

Configure Archive Path window displays.
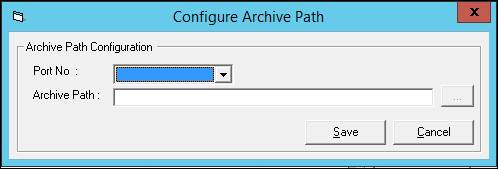
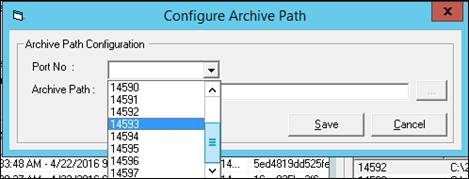
3. Select the Port No: from the dropdown list and browse the new Archive Path by clicking the icon![]() .
.
|
2 NOTE |
|
The Port Numbers will only get listed after the user has configured them in Manager-> Syslog/Virtual Collection Point.
|
4. Once the archive path is confirmed, click the Save button.
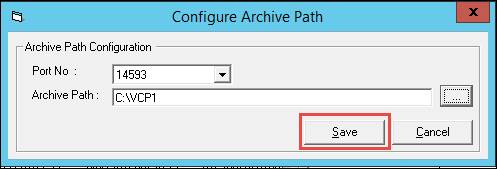
It will get listed in the configuration window.
NOTE: The user can also purge older archives by checking the “Purge Archives older than “option and entering the desired number of days.
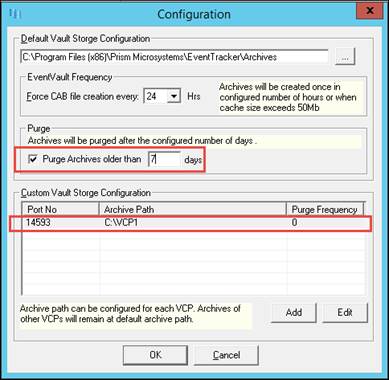
5. Click the OK button.
The below message gets displayed.

6. Click “Yes” to move the existing Archives to the new configured location.
It will list the existing Archive files with the source path.
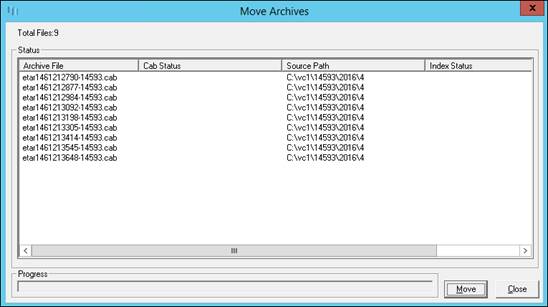
7. Click the Move button. It will successfully transfer all the existing archive files to the new location.
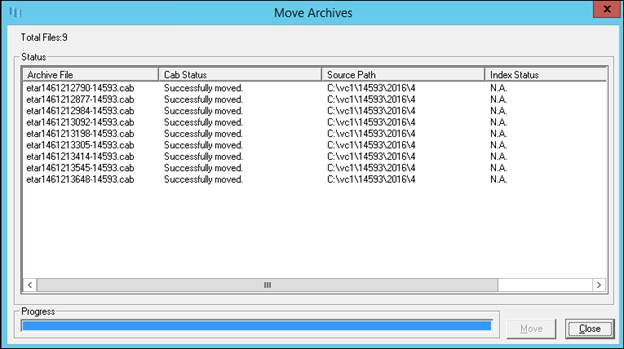
8. Click the Close button. The success message id displayed.
9. If you do not wish to move the existing archives to the newly configured archive path, click “NO”.
The success message gets displayed.
To Edit the Archive path for specific VCPs,
1. In the configuration window, select the port number from the list view
2. Click the Edit button.
This option enables you to save the archive summary in a text file. It helps you to locate particular .cab files to view, retrieve or extract events.
1. To save EventBox Information, double-click EventVault on the EventTracker Control Panel.
2. Select the archive file(s) from the Available EventBoxes list.
(OR)
Select the Select All checkbox to select all the archive files.
3. Click Save EventBox Metadata on the toolbar.
EventVault Manager displays the Save As window.
4. EventVault Manager saves the EventBox Info in archive-info.txt file.
You can also type the file name in the File name field.
5. Select the path where you want to store the archive summary and then click Save.
This option enables you to backup EventVault data locally or remotely in a desired location for a long-term storage. It helps you to retrieve the backup data if the production archives are tampered.
1 Open the EventVault Warehouse Manager.
2 Select the CAB file(s) from the Available EventBoxes list.
(OR)
Select the Select All checkbox to select all the archive files.
3 Click Backup Archives on the toolbar.
EventVault Warehouse Manager displays the confirmation message box.
4 Click Yes.
EventVault Warehouse Manager displays the Choose Directory window.
5 Select the folder where you want to store the event data and then click OK.
EventVault Warehouse Manager displays the ArchIntegrity report in the Notepad after successful completion of backup.
If there is no archive file to back up, EventVault Warehouse Manager displays the message box with appropriate message.
This option enables you to extract EventBox data into an MS Access database.
1 Open EventVault Warehouse Manager.
2 Select the CAB file(s) from the Available EventBoxes list.
3 Click Extract.
EventVault Manager displays the Choose Directory window.

4 Select the path where you want to store the event data, and then click Save.
After extracting the event data, EventTracker displays the ArchIntegrity report in the Notepad.
|
2 NOTE |
|
EventVault Warehouse Manager saves the extracted .cab file in the selected location with .mdb file extension. You can view the database file using MS Access.
|
This option helps you move all or selected CAB files to a new location. After physically moving the CAB files, EventTracker updates the archive index. Moving the CAB files to a new location does not harm your scheduled reports. You can run on demand reports, define reports, and even configure new scheduled reports as you normally do.
1 To move CAB files, open the EventVault Warehouse Manager.
2 Select the CAB files from the Available EventBoxes list.
(OR)
Select the Select All checkbox to select all the EventBoxes.
3 Click Move.
EventVault Warehouse Manager displays the confirmation message box.
4 Click Yes to proceed.
EventVault Warehouse Manager displays the Choose Directory dialog box.
5 Select the location (local or network) and then click OK.
(OR)
Manually type the new UNC path in the Vault Storage Folder textbox and then click OK.
EventVault Warehouse Manager moves all the selected files to the new location and displays the ArchIntegrity report in the Notepad.
This option enables you to delete an EventBox.
1 Open the EventVault Warehouse Manager.
2 Select the CAB file(s) from the Available EventBoxes list.
3 Click Delete.
4 EventVault Warehouse Manager displays the Confirmation message box.
5 Click OK.
EventVault Warehouse Manager deletes the selected EventBox and displays the ArchIntegrity report in the Notepad.
This option helps you view CAB files by port number.
1 Open the EventVault Warehouse Manager.
2 Select Show older than or Show From option.
3 Set the time range.
4 Select a port number from the Port Number drop-down list.
5 Click Show.
EventVault Warehouse Manager displays the CAB files of the selected port for the selected time range.
|
2 NOTE |
|
Port Number drop-down list lists all ports configured, default and VCP. Had you appended legacy CAB files (v 6.0 and earlier), select the 0-Legacy option. Port numbers were not appended to the names of Legacy CAB files.
|