Export and Import Utility enables you to export/import custom Categories, Filters, Alerts, Reports, Domains, Systems, Token Value and Behavior Correlation during migrate/upgrade process, and to transfer EventTracker data from one system to the other in your enterprise. Suppose, you have configured Scheduled Reports in System A and want to configure Scheduled Reports in System B with same configuration settings. You need not configure again in System B, just export the Scheduled Reports configured in System A and then import those .issch files into System B.
1 To export categories, select the Start button, select All Programs, and then select Prism Microsystems.
2 Select EventTracker, select EventTracker Control Panel, and then select Export Import Utility.
EventTracker displays the Export Import Utility window.
|
Field |
Description |
|
Category |
Select a Category group(s) to add all Categories that belong to that group to the Selected list or expand the Category group(s) to add individual Category. Selected Category group(s) / Category (s) are added to the Selected list. |
|
Selected |
To remove Category group(s) / Category(s), clear the respective checkbox(s) in the Category list. |
3 In Export tab, select the required Category, select the >> button and then select the Export button.
EventTracker displays the Save As pop-up window.
4 Type the file name in the File Name field.
|
2 NOTE |
|
The valid file extension is .iscat. |
5 Click Save.
EventTracker displays the Export Import Utility message box.
6 Click OK.
1 To export filters, select the Start button, select All Programs, and then select Prism Microsystems.
2 Select EventTracker, select EventTracker Control Panel, and then select Export Import Utility.
3 In Export tab, select the Filters option.
|
Field |
Description |
|
Filters |
Select a Filter / Filters from this list. Click Add-> to add filters to the Selected list. Click Add All>> to add all Filters to the Selected list. To select multiple filters, hold down the CTRL key on your keyboard and click the filters. |
|
Selected |
Select a Filter / Filters from this list. Click <-Remove to remove the selected Filter / Filters from this list. Click <<Remove All to remove all Filters from this list. |
4 Select the required Filters and then click Export.
5 Type the file name in the File Name field.
|
2 NOTE |
|
The valid file extension is .isfil. |
6 Click Save.
EventTracker displays the Export Import Utility message box.
7 Click OK.
1 To export alerts, select the Start button, select All Programs, and then select Prism Microsystems.
2 Select EventTracker, select EventTracker Control Panel and then select Export Import Utility.
|
Field |
Description |
|
Export E-mail Settings |
Select this checkbox to export Alerts along with the corresponding e-mail settings, if any. |
|
Alerts |
Select an Alert / Alerts from this list. Click Add-> to add to the Selected list. Click Add All>> to add all Alerts to the Selected list. To select multiple Alerts, hold down the CTRL key on your keyboard and click Alerts. |
|
Selected |
Select an Alert / Alerts from this list. Click <-Remove to remove the selected Alert / Alerts from this list. Click <<Remove All to remove all Alerts from this list. |
3 Select the required alerts and then click Export.
4 Type the file name in the File Name field.
|
2 NOTE |
|
The valid file extension is .isalt. |
5 Click Save.
EventTracker displays the Export Import Utility message box.
6 Click OK.
1 To export system groups, select the Start button, select All Programs, and then select Prism Microsystems.
2 Select EventTracker, select EventTracker Control Panel and then select Export Import Utility.
3 Select the Systems and Groups option.
EventTracker displays the systems groups.
|
Field |
Description |
|
Systems and Groups |
Select a system group(s) to add all systems that belong to that group to the Selected list or expand the system group(s) to add individual system. Selected system group(s) / system(s) are added to the Selected list. |
|
Selected |
To remove system group(s) / system(s), clear the respective checkbox(s) in the Systems and Groups list. |
4 Select the required system/groups and then click Export.
5 Type the file name in the File Name field.
|
2 NOTE |
|
The valid file extension is .issys. |
6 Click Save.
EventTracker displays the Export Import Utility message box.
7 Click OK.
1 To export scheduled reports, select the Start button, select All Programs, and then select Prism Microsystems.
2 Select EventTracker, select EventTracker Control Panel and then select Export Import Utility.
3 Select the Reports option.
|
Field |
Description |
|
Scheduled Reports/ Defined reports |
Select a Scheduled report /Defined reports from this list by selecting Scheduled or Defined. Click Add-> to add to the Selected list. Click Add All>> to add all Scheduled/ Defined reports to the Selected list. To select multiple Scheduled/Defined reports, hold down the CTRL key on your keyboard and click Scheduled/Defined reports. |
|
Selected |
Select a Scheduled report / Defined report from this list. Click <-Remove to remove the selected Scheduled report / reports from this list. Click <<Remove All to remove all Scheduled/Defined reports from this list. |
|
2 NOTE |
|
The valid file extension for Old type is .issch and for New type is .etcrx. Select the option as per extension. |
For Legacy with extension .issch,
1 Select the Legacy option.
2 Select the required Scheduled /Defined Report option, and then click Export.
3 Type the file name in the File name field.
4 Click Save.
EventTracker displays the below message box:
5 Click OK.
For the option New type with extension .etcrx,
1 Select the option New type
The export report window displays:
2 In the Title field, enter a suitable title.
3 In the Frequency field, select the option hourly/daily/last 24 hours/ twice daily/weekly/last 1 week/once in week/monthly, from the dropdown list.
4 In the Type field, select the report type from the dropdown list and click the search logo![]() .
.
5 Select the reports to be exported by clicking the checkbox.
6 In the File Name field, enter the report name and select the export icon![]() .
.
7 Click Save.
EventTracker displays the Export Import Utility message box.
3 Click OK.
1 To export behavior Correlation, select the Start button, select All Programs, and then select Prism Microsystems.
2 Select EventTracker, select EventTracker Control Panel and then select Export Import Utility.
3 Select the Behavior Correlation option.
|
Field |
Description |
|
Behavior Correlation |
Select a Behavior Correlation from this list. Click Add-> to add to the Selected list. Click Add All>> to add all Behavior Correlation to the Selected list. To select multiple Behavior Correlation, hold down the CTRL key on your keyboard and click Behavior Correlation. |
|
Selected |
Select a Behavior Correlation from this list. Click <-Remove to remove the selected Behavior Rule / Behavior Correlation from this list. Click <<Remove All to remove all Behavior Correlation from this list. |
4 Click Export.
5 Type the file name in the File name field.
|
2 NOTE |
|
The valid file extension is .isrule.
|
6 Click Save.
EventTracker displays the Export Import Utility message box.
7 Click OK.
1 To export behavior Correlation, select the Start button, select All Programs, and then select Prism Microsystems.
2 Select EventTracker, select EventTracker Control Panel and then select Export Import Utility.
3 Select the Token Value option.
|
Field |
Description |
|
Token Value |
Select a Token Value from this list. Click Add-> to add to the Selected list. Click Add All>> to add all Behavior Correlation to the Selected list. To select multiple Token Values, hold down the CTRL key on your keyboard and click Token Value. |
|
Selected |
Select a Token Value from this list. Click <-Remove to remove the selected Token Value from this list. Click <<Remove All to remove all Token Value from this list. |
4 Click Export.
5 Type the file name in the File name field.
|
2 NOTE |
|
The valid file extension is .istoken. |
6 Click Save.
EventTracker displays the Export Import Utility message box.
7 Click OK.
1 Select the Start button, select All Programs, and then select Prism Microsystems.
2 Select EventTracker, select EventTracker Control Panel, and then select Export Import Utility.
3 Click the Import tab.
EventTracker selects the Category option by default.
4 Click the browse ![]() button.
button.
EventTracker displays the Open pop-up window.
5 Navigate and locate the category file you want to import.
6 Click Open.
EventTracker updates the Source field with the path of the Category file.
(OR)
Type the path of the Category file in the Source field.
7 Click Import.
EventTracker displays the Export Import Utility message box.
8 Click OK.
1 Select the Start button, select All Programs, and then select Prism Microsystems.
2 Select EventTracker, select EventTracker Control Panel, and then select Export Import Utility.
3 Click the Import tab.
4 Select the Filters option. Click the browse button![]() .
.
EventTracker displays the Open pop-up window.
5 Navigate and locate the filters file you want to import. Click Open.
EventTracker updates the Source field with the path of the filters file.
(OR)
Type the path of the filters file in the Source field.
6 Click Import.
EventTracker displays the Export Import Utility message box.
7 Click OK.
1 Select the Start button, select All Programs, and then select Prism Microsystems.
2 Select EventTracker, select EventTracker Control Panel, and then select Export Import Utility.
3 Click the Import tab. Select the Alerts option.
4 Click the browse ![]() button.
button.
EventTracker displays the Open pop-up windows.
5 Navigate and locate the Alerts file you want to import. Click Open.
EventTracker updates the Source field with the path of the Alerts file.
(OR)
Type the path of the Alerts file in the Source field.
By default, EventTracker selects the Import E-mail Settings checkbox to import Alerts along with their e-mail configuration settings.
Clear this checkbox to import Alerts without the associated e-mail settings.
6 Select an appropriate Set Active option.
|
2 NOTE |
|
Active Alerts: Active Alerts are Alert events that have at least one action set. |
Select the Only if notifications set option to make an Alert active, had you set any sort of action to the Alert.
Select the By default option if you wish to make an Alert active irrespective of whether the Alert has an associated action or not.
7 Click Import.
EventTracker displays the Export Import Utility message box.
8 Click OK.
1 Select the Start button, select All Programs, and then select Prism Microsystems.
2 Select EventTracker, select EventTracker Control Panel, and then select Export Import Utility.
3 Select the Import tab. Select the Systems and Groups option.
4 Select the EventTracker (*.issys) option to import the .issys type file.
(OR)
Select the Custom format option to import other type of files such as .txt files. The files should be written in the prescribed format.
· Click Add systems option.

Text file contains one system name per line.
· Click Remove systems option.
No system name included in the text file.
· Select Add systems & Groups option.
Text file contains system and group name.
5 Click the browse ![]() button.
button.
EventTracker displays the Open pop-up windows.
6 Navigate and locate the systems and groups file you want to import. Click Open.
EventTracker updates the Source field with the path of the systems and groups file.
(OR)
Type the path of the systems and groups file in the Source field.
7 Click Import.
EventTracker displays the Export Import Utility message box.
8 Click OK.
1 Select the Start button, select All Programs, and then select Prism Microsystems.
2 Select EventTracker, select EventTracker Control Panel, and then select Export Import Utility.
3 Select the Import tab, and then select the Reports option.
|
2 NOTE |
|
The valid file extension for Legacy is .issch and for New type is .etcrx. Select the option as per extension.
|
For the option Legacy type:
1 Click the browse ![]() button.
button.
EventTracker displays the Open pop-up window.
2 Navigate and locate the Scheduled reports file you want to import. Click Open.
EventTracker updates the Source field with the path of the Scheduled reports file.
(OR)
Type the path of the Scheduled reports file in the Source field.
3 Click Import.
EventTracker displays the Export Import Utility message box.
4 Click OK.
For the option New type:
1 When the New type option is selected, EventTracker displays the Reports Import window.

2 Browse the report file by click the Select file button.
3 Give a suitable title in the Title field.
4 Select the run time option and click the Set button.
NOTE: If report(s) contains template, the user will first have to import the templates and then proceed with the Export Import Utility.
The report(s) gets displayed as shown in the figure below:
5 Click the EDIT hyperlink to make changes in the report.
The Edit Report window displays.
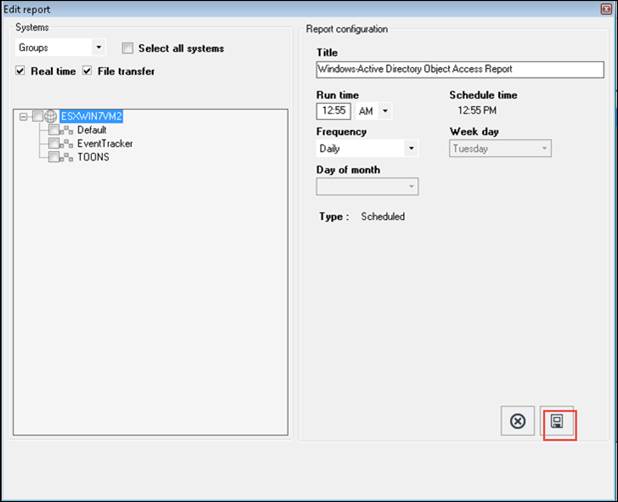
6 Click the save icon as highlighted in the figure above.
7 Select the reports by clicking the checkbox and then click the import icon![]() in the Report Import window.
in the Report Import window.
EventTracker displays the below message:
1 Select the Start button, select All Programs, and then select Prism Microsystems.
2 Select EventTracker, select EventTracker Control Panel, and then select Export Import Utility.
3 Select the Import tab, Select the Behavior Correlation option.
4 Click the browse ![]() button.
button.
EventTracker displays the Open pop-up window.
5 Navigate and locate the Behavior Correlation file you want to import. Click Open.
EventTracker updates the Source field with the path of the Behavior Correlation file.
(OR)
Type the path of the Behavior Correlation file in the Source field.
6 Click Import.
EventTracker displays the Export Import Utility message box.
7 Click OK.
1 Select the Start button, select All Programs, and then select Prism Microsystems.
2 Select EventTracker, select EventTracker Control Panel, and then select Export Import Utility.
3 Select the Import tab, Select the Token Value option.
4 Click the browse ![]() button.
button.
EventTracker displays the Open pop-up window.
5 Navigate and locate the Behavior Correlation file you want to import. Click Open.
EventTracker updates the Source field with the path of the Token Value file.
(OR) Type the path of the Behavior Correlation file in the Source field.
6 Click Import.
EventTracker displays the Export Import Utility message box.
7 Click OK.